Mini Wedding Cupcakes

Pink & Blue Wedding Cupcakes

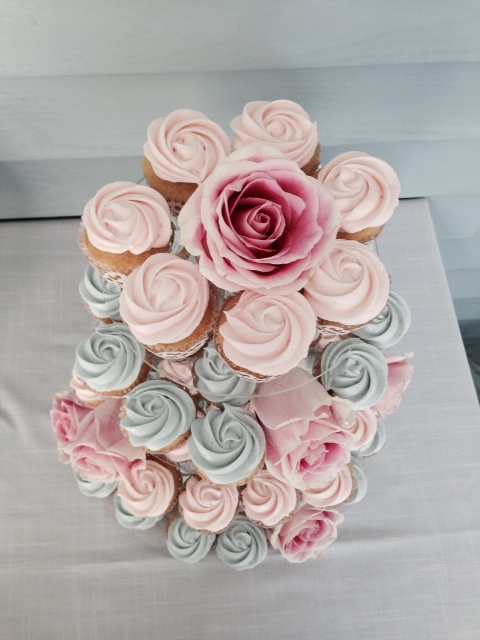
Last weekend my cousin and her fiance were married and as a gift I made her wedding cupcakes. Her colours were pink and blue, and her only request was that she wanted mini cupcakes.

pink and blue wedding cupcakesThese are vanilla cupcakes and cream cheese frosting, piped with a Wilton 1M tip.

I ordered both the acrylic 4-tier cake stand and the lace cupcake liners from etsy. And although the seller specified that the cupcake liners were for mini cupcakes, they were enormous. My cupcakes looked like dieting spokespeople posing for after shots in their old trousers.

mini wedding cupcakes

Sadly, I ended up having to throw the liners out. Just kidding. I cut them in half and hand-glued all 100 of them back together. And in case you’re wondering or perhaps suffering a brain hemorrhage, I assure you that spending an evening cutting in half and hand-gluing together 100 laser-cut lace cupcake liners was not remotely enjoyable. It is the stuff of nightmares. If your nightmares feature a lot of glue and paper sticking to your fingers.

The cutting cake:

wedding cake, cutting cake, pink wedding cakeThis is just two 6″ vanilla cakes layered and frosted with cream cheese frosting piped on in 1M swirls. By far, this is the easiest and quickest way I know to frost a cake.

The roses I ordered from a local florist and refrigerated in water over night. After frosting the cake I took the flowers out of the fridge and, leaving 1 or 2 inches of stem to wrap in Saran (hooray for not poisoning people!), inserted them into the top of the cake. This turned out to be an easy and pretty cake topper.

wedding cupcakes_003

This ultimately took a lot of planning, only because I had to hunt down the liners and the cake stand, but I think they turned out okay for a first attempt at wedding cupcakes. Since it’s been a warm summer I was concerned the frosting would swoon in the heat, but it held up–possibly because I added 1tbsp cornstarch with the powdered sugar. Have you tried this before?

That’s it. Hope you enjoyed this week’s saga on wedding cupcakes!


Tagged , , , ,

Two-Tone Cupcakes for Spring

Two-toned Spring Cupcakes

There’s more than one side to these cupcakes.

Get it? I made it seem like cupcakes are complex beings capable of establishing multifaceted selfhood and personality. But really they’re just two different colours.

I found this cupcake-splicer at the Otter Co-op–I think it might be made by Wilton. Make any batch of cupcakes you like, divide batter, tone with food colouring. Or if you’re averse to using food colouring, you can go classic chocolate and vanilla.

WinterSpring 2013 495

WinterSpring 2013 492 WinterSpring 2013 493  WinterSpring 2013 497 WinterSpring 2013 499 WinterSpring 2013 503

The frosting is buttercream with almond extract. A word to the wise: don’t be an arrogant baker like me and carelessly dump an entire capful of almond extract into your icing. The result will be all kinds of awful.  Here’s a picture of my cat.

Rupert the Cat

Tagged , ,

Halloween Cupcakes: Spiced Pumpkin & Cream Cheese

Halloween Cupcakes Pumpkin Creamcheese

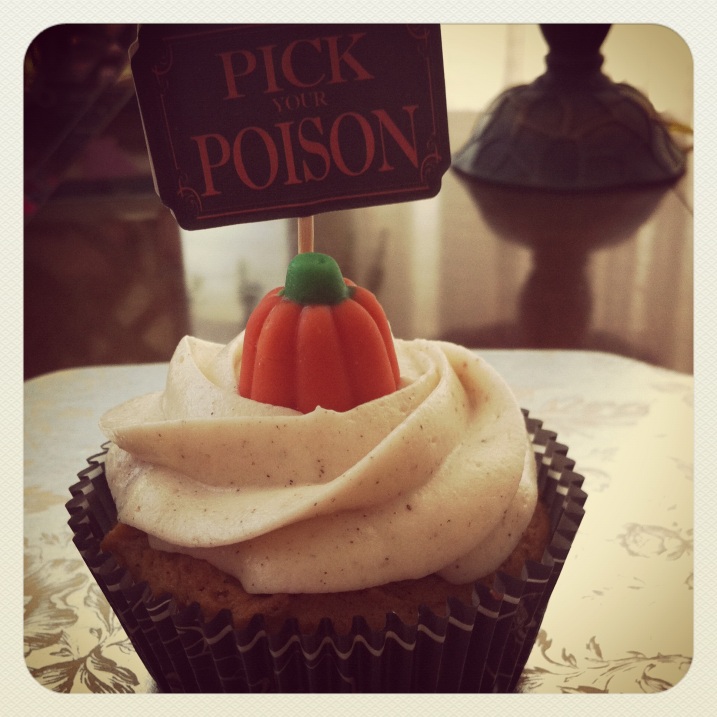
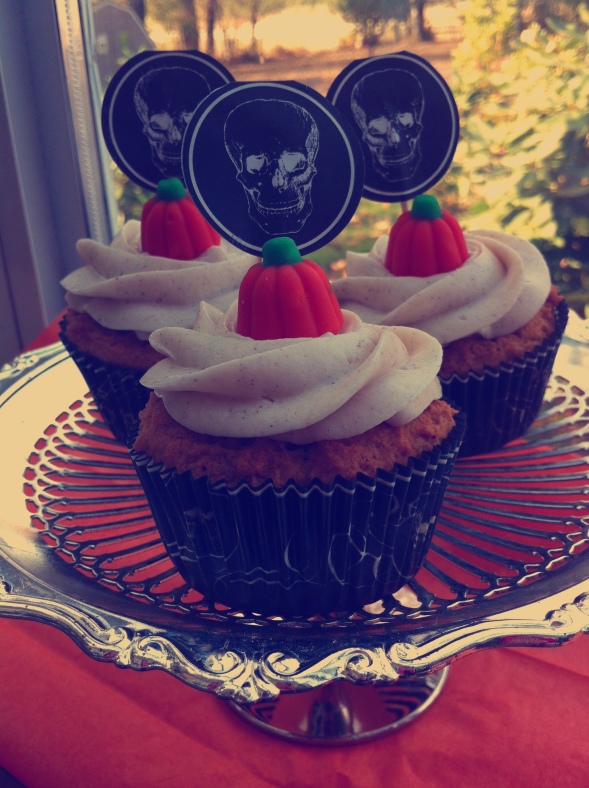
Pumpkin Cupcakes with Spiced Cream Cheese Frosting

So these are really good. So good that I Instagrammed them. Because Halloween is coming and I thought they should look creepy and like a serial killer took pictures of them.

The recipe I followed is Martha Stewart’s Pumpkin Cupcakes

Halloween Cupcakes Pumpkin Cream Cheese

Melt the butter in a small saucepan over low-medium heat. Cook until it turns a light brown colour (careful not to burn it). It’ll suddenly start smelling really good when it’s ready to come off the heat, at which point pour into a bowl and set aside.

Halloween Cupcakes Pumpkin Cream Cheese

In stand mixer, mix together pumpkin puree and both sugars until smooth. Add the egg, mix until smooth. Add vanilla and cooled butter. Blend on high until smooth.

Halloween Cupcakes Pumpkin Cream Cheese

In a separate bowl, combine flour, salt, baking powder, and spices. Whisk together.

Halloween Cupcakes Pumpkin Cream Cheese

Add dry ingredients to pumpkin mixture and blend together for 30 seconds until completely smooth. If you want these to look extra orange and pumpkin-y, feel free to throw in some food colouring.

Spoon into liners, filling 1/2 to 2/3 full. Batter will be quite thick.

Halloween Cupcakes Pumpkin Cream Cheese

Bake 14 to 20 minutes until the tops of the cupcakes spring back when applying light pressure with fingertip.

Spiced Cream Cheese Frosting

Ingredients:

1/2 package cream cheese, room temperature

1/2 cup unsalted butter, room temperature

1 teaspoon vanilla

1 teaspoon cinnamon

1/2 teaspoon nutmeg

1/4 teaspoon cloves

2 cups powdered sugar

Halloween Cupcakes Pumpkin Cream Cheese

In stand mixer, blend cream cheese and butter together for 2 minutes until light and fluffy.

Add vanilla and spices. You can adjust the amount/selection of spice to taste. Add powdered sugar 1/2 cup at a time, mixing well in between. Pipe onto completely cooled cupcakes and enjoyyy.

Halloween Cupcakes Pumpkin Cream Cheese

Halloween Cupcakes Pumpkin Cream Cheese

Halloween Cupcakes Pumpkin Cream Cheese

Halloween Cupcakes Pumpkin Cream Cheese

Tagged , , , , , ,

Recipe: Chocolate Wasabi Cupcakes

Chocolate Cupcakes with Wasabi Buttercream Frosting

I’ve always wanted to try this. I think maybe next time I’d do white chocolate, but overall I wasn’t repulsed by the end result. If you like wasabi things, like wasabi in your soy sauce or wasabi peas, you’d probably like these guys.

Chocolate Cupcakes

You can use any chocolate cupcake recipe. I referenced Leslie Fiet’s chocolate cupcake recipe.

Line mini muffin tin and preheat oven to 350 F.


Melt chocolate chips in hot espresso/coffee.  Set aside.

Combine egg, unsweetened apple sauce, oil, and vanilla. Blend or whisk together until smooth. Slowly pour chocolate mixture down the side of the bowl, mixing as you go. Make sure to pour slowly or you’ll cook the egg.

Tip: the coffee doesn’t make your cupcakes taste like espresso. It just enhances the chocolate flavour.

In a separate bowl, combine flour, sugar, baking powder, salt, and cocoa powder. If you want you can add wasabi powder but it didn’t do much in terms of flavour. Whisk together, then add to wet ingredients. Mix until smooth and lumps are gone.

Distribute batter into lined cupcake tin, filling 2/3. I did mini ones because I thought it’d be better for an uncommon flavour.

Bake @ 350 F, 12-14 minutes.

Wasabi Buttercream Frosting

Ingredients:

1/2 cup unsalted butter, room temperature

2 cups powdered sugar

1 teaspoon vanilla

1-2 tablespoons whipping cream or whole milk

1 tablespoon wasabi powder, to taste

Mix room temperature, unsalted butter for 2 minutes until fluffy and smooth. Add vanilla, whole milk/cream, and mix on high.

Sift in powdered sugar, mixing 1/2 cup at a time until it reaches the consistency you like.

Now. I added the wasabi powder directly to the frosting and found that it didn’t add that much flavour. Then I dissolved 2 teaspoons of the powder in hot water to make a paste and waited 5 minutes for the flavour to come out before blending it into the frosting.

I also found that the flavour developed in the frosting over time (it tasted stronger after the cupcakes had sat out over night). In this case I think less is more. Also the wasabi doesn’t colour the frosting so I added some yellow & blue (which makes green, in case you don’t know your colour theory!).

I wasn’t sure about these at first, but every time I try one they grown on me. I think you just have to be a wasabi fan.

Tagged , , ,

Recipe: Homemade Granola Bars

Granola Bars for Fall: Pumpkin Chocolate Date Bars

FALL IS COMING. Is anyone else excited/ready for summer to be over?

This recipe is modified from the “Scrumptious Chewy Homemade Granola Bars” my mom found in the newspaper. They’re definitely chewy and extremely filling. Granola bars never work out when I try to make them, but I’d totally use this one again.


Recipe

Dry Ingredients

2 1/2 cups quick-cooking oats

1 cup dried coconut

1/2 cup chopped nuts

3/4 cup chopped dates

1/2 cup mini dark chocolate chips

1/3 cup whole wheat flour

1/4 cup ground flaxseed

1 teaspoon cinnamon

1/2 teaspoon salt

Wet Ingredients

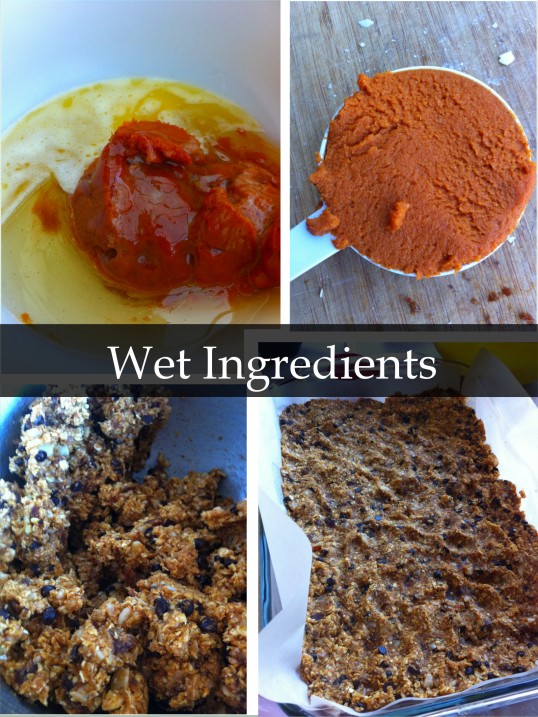
3/4 cup canned pure pumpkin

1/2 cup agave syrup

1/4 cup coconut oil, melted

1 teaspoon vanilla

Instructions

  1. Preheat oven 350F. Line 9×13-inch baking pan with parchment paper.
  2. Combine dry ingredients in a large bowl, using paddle attachment if in stand mixer to mix together.
  3. In a separate bowl, combine wet ingredients, mixing together with a whisk.
  4. Pour wet ingredients over dry, using paddle attachment to ensure ingredients are completely mixed. No stray oats at the bottom of your bowl.
  5. Pour mixture into your pant, using spatula to press into the corners and edges tightly.
  6. Bake 20 minutes or until edges are golden.
  7. Remove from oven, cooling completely before you take it out of the pan. Wrap tightly in plastic wrap and store in cupboard or fridge.


If you can’t find ground flaxseed, just grind some in a coffee grinder or maybe a magic bullet.

Combine oats, coconut, nuts (I used almonds), dates, chocolate chips, and flour. Mix well.

In separate bowl, combine wet ingredients. You can use honey and melted butter in place of the agave and coconut oil.

Add to dry ingredients, mixing well. Press into lined baking pan. Make sure you leave some parchment paper hanging over the edge of the pan so you can lift the bars out easily.

Bake @ 350F for 20-25 minutes. Cool completely.

Rupert in a sink.

Tagged ,

Recipe: Coffee Cupcakes with Salted Caramel Buttercream

Re-invent the classic coffee cake

Coffee Cupcakes with Salted Caramel Frosting


HOORAY, YOU GUYS. AN ACTUAL CUPCAKE RECIPE FOR MY CUPCAKE BLOG.

I love making cupcakes. I love picking out the cupcake liners. I love thinking about the next kind of cupcakes I will make. I love making cupcakes more than I love eating them. I love making cupcakes more than most things in life. Except for Rupert.

So, Coffee Cake.

Coffee cake is a bit misleading because it doesn’t actually taste like coffee…it’s just called that because people generally eat it with a nice cup of java. This is one of those things like when the Brits say they’re having tea, but they really mean they’re having dinner.

Typically, coffee cake is a single layer cake flavoured with things like cinnamon and nutmeg, and is topped with either a streusel or brown sugar. My grandma used to make this recipe for her kids, and I’ve been making it since I learned to bake. I used to make it for my uncle’s birthday every year until he passed away.  But recently we celebrated his son’s birthday and I decided to keep with tradition.


Crumble-Topped Coffee Cake

topping

1/2 cup brown sugar

1 teaspoon cinnamon

2 tablespoons vegetable oil

cake

3 cups all purpose flour

2 tablespoons baking powder

3/4 teaspoon salt

1 1/3 cups cold coffee

1 teaspoon vanilla

1 1/2 cups sugar

2 eggs, room temperature

1/2 cup vegetable oil

Directions

Preheat oven to 350 F. Makes 24 Cupcakes.

  1. For the topping, combine brown sugar, cinnamon, and 2 tablespoons oil in a separate bowl. Set aside.
  2. Sift flour, baking powder, salt, and sugar into a mixing bowl.
  3. In stand mixer, beat eggs until pale and thick (about 10 minutes). Stir in 1/2 cup oil, coffee, and vanilla.
  4. Make a ‘well’ in the middle of dry ingredients. Add egg mixture all at once, stirring until smooth. Don’t over-mix.
  5. Divide evenly into cupcake liners, filling about 2/3 full.
  6. Spread the brown sugar topping evenly over the cupcakes. Use a toothpick to swirl it through the batter.
  7. Bake 15-20 minutes.

Note: If you’re just making the cake, I recommend putting the brown sugar mix on top. But for some of the cupcakes, I put 1 tablespoon of batter into the liners, then the topping, then another tablespoon of batter on top–I did this because I knew I’d be frosting them, so this way you get the sugary deliciousness in the middle.

Coffee Cupcakes with Salted Caramel Frosting

Mix brown sugar, cinnamon, and oil. Set aside.

Coffee Cupcakes with Salted Caramel Frosting

Sift dry ingredients into a separate bowl and whisk together.

In stand mixer, beat eggs until thick. Add cold coffee (hot coffee will scramble your eggs), vanilla, and 1/2 cup oil. Beat on low until combined.

Make a well in the centre of dry ingredients. Pour the wet mixture in, stirring just until combined.

Fill liners about 2/3 full. These cupcakes rise a lot, so unless you want muffin tops, just be careful about overfilling.

Place about a teaspoon of topping onto the cupcakes. Swirl it around with a toothpick or small knife. Or hide the sugar in the middle of your cupcake by first placing a tablespoon of batter into the liners, then the topping, then another tablespoon of batter.

Bake for 15-20 minutes. Cupcakes are done when the tops bounce back when lightly pressed.

Don’t want to bother with the slings and arrows of outrageous frosting? Don’t. These gems taste great on their ownsies.


Salted Caramel Buttercream

I should mention that salted caramel buttercream requires you to make caramel, which may cause you to cry, which is okay because tears are salty and you will be making salted caramel.

It’s really not that hard. You don’t even need a candy thermometre. Just, for the love of god, don’t decide to do a load of laundry while you wait for the sugar to boil. You will set your house on fire.

Homemade Salted Caramel Sauce

Leave the caramel in your saucepan and set aside to cool while you make the buttercream. This is Swiss meringue, but you can make any kind of frosting you want and add the caramel in after.

Recipe

1 stick (1/2 cup) salted butter

2 sticks (1 cup) unsalted butter

1/2 cup sugar

4 large egg whites

1 teaspoon vanilla

1/2 cup confectioner’s sugar

Directions

Note: Butter and egg whites must be room temperature

  1. With hand mixer and in a separate bowl, beat butter until pale and fluffy.
  2. In a double boiler, combine sugar and egg whites, whisking constantly until warm to the touch and the sugar is dissolved (you shouldn’t feel any sugar granules if you rub the mix between your fingers).
  3. Pour egg white mix into stand mixer and beat on medium-high speed until stiff peaks form. Keep mixing until the mix is completely cool (just feel the bottom of the bowl). About ten minutes.
  4. Reducing speed, add butter a little bit at a time, mixing well after each addition. Add vanilla.
  5. At this point you’re ready to add your caramel. If it’s gone hard, place the pan back on the burner, but only on low setting. Stir until it’s softened up enough to drizzle into your frosting, but not so that it’s boiling hot.
  6. With mixer on medium speed, slowly pour the caramel in and beat until fully incorporated.
  7. I found the frosting tasted too buttery, so I added icing sugar to sweeten it up. You may find you don’t need any, however.


Coffee Cupcakes with Salted Caramel Buttercream

Coffee Cupcakes with Salted Caramel Buttercream

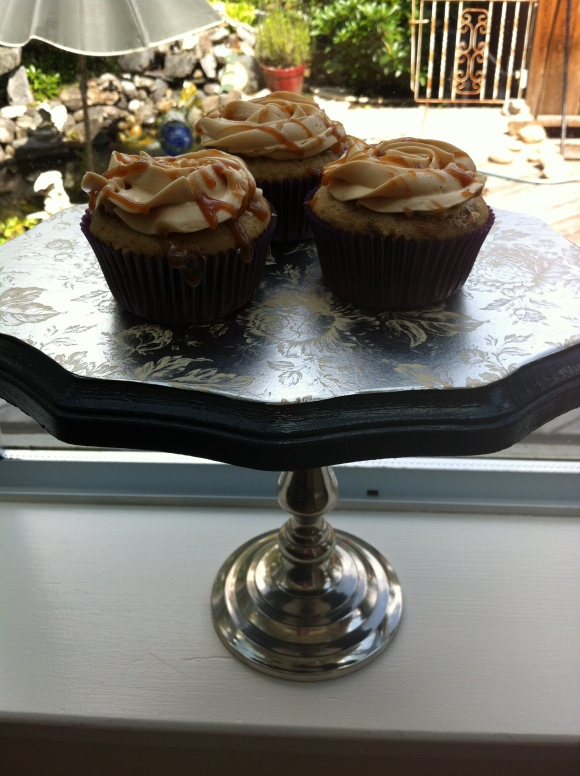
I made more caramel to drizzle on top and served on a cake stand that I also made from an old candle stick. If you choose not to make the frosting, feel free to drizzle caramel on the cupcake anyway.

Overall the reviews were good and the salted caramel went super well with the brown sugaryness of the coffee cake. I felt the cake was dense enough that the buttercream didn’t stand out as too buttery. I’m just one of those people who dislikes a buttery frosting. In this case I could have gone back for seconds and thirds had there been any left.

Cheers and happy baking!

Homemade Marshmallows

I’ve always wanted to try making my own marshmallows, but was deterred because it seems like a messy and complicated process. I never work with gelatin and didn’t know where to even get it. Then I saw a box of it at Superstore of all places and decided to go for it.

While making homemade marshmallows is kind of a sticky, if not messy, process–it’s not that difficult. Also I discovered you can pretty much make them any flavour you want.

When I saw some leftover whipping cream in the back of the fridge I decided then to make caramel sauce and see what happened when you add such a thing to marshmallows.

Salted Caramel Marshmallows

Salted Caramel Marshmallows

For my first attempt I used a recipe posted by Bakerella, which she borrowed from Shauna Sever’s Marshmallow Madness. I totally want to own this book, because then I could just make tons of marshmallows and hide them in cupcakes or whatever.

First up was the caramel sauce, which is always kind of exasperating and stressful. I’ve set the fire alarm off and ruined a few pots from setting things on fire. One time, a bit of sugar melted onto the counter and I sliced my finger open trying to chip it off. I don’t love making caramel sauce, but it gets less dangerous every time I make it.

For the marshmallows I made caramel sauce with chocolate sea salt.

Salted Caramel Marshmallows

First, sprinkle your gelatin over cold water and let sit for ten minutes.

Salted Caramel Marshmallows

Meanwhile, stir together sugar, water, half the corn syrup, and salt in a saucepan until sugar dissolves. It’s essential that you have a candy thermometre for this. They’re not that expensive and it just makes baking easier. Boil the mixture untouched until it reaches 240 F.

Microwave your gelatin for 30 seconds, then add to the rest of the corn syrup in a stand mixer. Mix on low, slowing pouring your sugar mixture. Gradually increase your speed, mixing until everything triples its volume and turns a thick, pillowy white.

At this point you can add any flavour you want. I just drizzled in about 1/2 cup cooled caramel sauce. Mix until incorporated, then spread the whole goopy mess into a greased pan.

Salted Caramel Marshmallows

The recipe just said to grease the pan. I would definitely grease and coat with confectioner’s sugar. The oil just made the marshmallows a bit slippery and greasy.

After spreading the mixture as best I could, I drizzled the rest of the caramel sauce over top.

The recipe calls for a “classic coating” of 3/4 cups confectioner’s sugar sifted together with 1/2 cup corn starch. Sprinkle this on once your marshmallows have had a few hours to chill in the refrigerator. Cut them into squares or circles or hearts or moons or David Bowie’s head and coat the sides as well.

Then put them on a pretty serving dish long enough to take a picture and then EAT THEM ALL BECAUSE THEY ARE SALTY AND DELICIOUS.

Salted Caramel Marshmallows

Salted Caramel Marshmallows

Cotton Candy Marshmallows

cotton candy marshmallows

Some marshmallow recipes include egg whites. Since my first attempt didn’t call for them, I decided to follow a recipe that did just to see the difference.

Whether it’s because this was my second attempt or it’s a bit cooler weather today or I powdered the pan this time, or because of the egg white, I just found these ones turned out better. They’re fluffy and don’t droop sadly in your fingers.

I borrowed from Smitten Kitchen and I’d do it again I tells ya.

cotton candy marshmallows

This recipe uses the same ingredients, except it includes egg white and I used cotton candy flavouring with some pink food colour.

cotton candy marshmallows

Before starting, grease the pan and coat in confectioner’s sugar.

Pour gelatin powder over the cold water and set aside.

In a heavy saucepan, stir corn syrup, sugar, water, and salt together with a wooden spoon. Once the sugar is dissolved, turn heat to medium-high and allow to boil untouched. You want it to reach a temperature of 240 F on your candy thermometre.

cotton candy marshmallows

When the mixture reaches 240 F, pour your gelatin into the stand mixer, then slowly pour the hot sugar over top of it. Stir until the gelatin is fully dissolved.

This recipe differs from the other one because you don’t divide the corn syrup. I found it easier tbh.

With the stand mixer on high, beat until the mix turns thick, white, and triples in volume. While that’s going, you can beat your egg whites with the hand mixer until stiff peaks form. Add them to the sugar mix, including any flavour and/or colour of your choosing. Beat until incorporated.

cotton candy marshmallows

Spread the marshmallow into your pan, pressing it into the corners. This recipe just calls for confectioner’s sugar without the corn starch, so I just sifted some over top.

Keep it in the fridge for a few hours, cut, plate, and enjoy. I totally recommend putting some of these pillowy clouds in your hot chocolate.

cotton candy marshmallows

cotton candy marshmallows

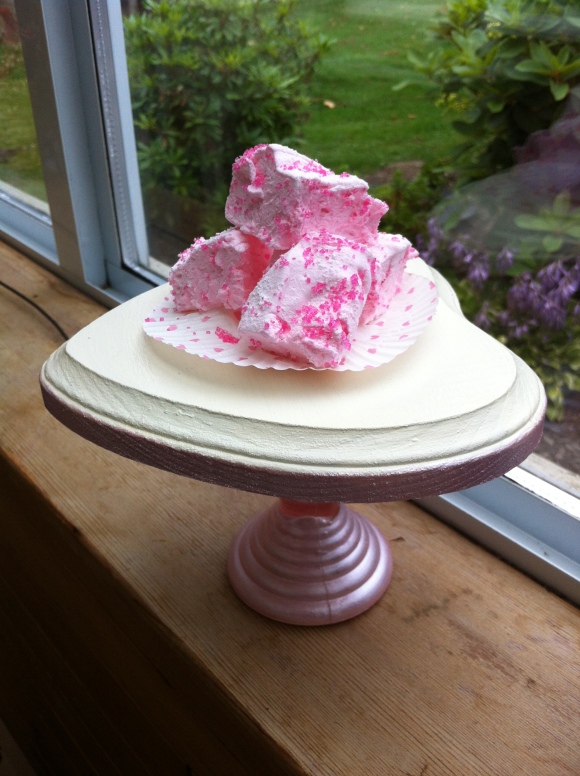
This is a cake stand I made that I thought suited the wee marshmallows perfectly.

So homemade marshmallows are easy as pie (they’re easier to make than pie tbh).

What flavours can YOU come up with?

Tagged , ,

Bake it: Carrot Orange & Bran Breakfast Muffins

Orange Carrot Bran Muffins

Orange you glad it’s not just another bran muffin?

Sometimes people are like, o gad, bran muffins suck. But these bran muffins are more than just 30% of your daily fiber. They’re zesty. Literally, because I put orange zest in them. But also they taste good.

For these I borrowed a Carrot Bran Muffin recipe from The Kitchen Magpie.

Modifications:

  1. The recipe calls for cinnamon, nutmeg, and cloves–I also added some ground ginger. Next time I might add candied ginger. I just think it might add a weird but maybe awesome surprise?
  2. In place of 1/2 cup brown sugar, I used coconut sugar I found at Ralph’s Market. I find it’s less sweet and doesn’t taste like coconut.
  3. I grated zest from one orange into the batter right when you add the carrots. Also the batter looked a bit thick so I squeezed about a tablespoon of orange juice into it as well.
  4. I also liked Kitchen Magpie/Karlynn’s tip of soaking the raisins before you add them. It inflates them like little bloated grape corpses so they don’t get dry and gross while they bake.

She used wheat bran, but I just stole some of my dad’s All-Bran cereal and soaked it in the milk first before adding it to the batter.

This recipe gave me 18 muffins and they turned out moist and spicy, but thankfully not cloyingly sweet like those behemoths you get from Costco that could feed half the Duggars.

Coconut Sugar

coconut sugar


Orange-y Cream Cheese Topping

So because I put the muffins in cupcake liners, they looked kind of lonesome and pathetic without their little frosting swirly-hats. So I threw together a topping that can’t really be called icing, but is sweet enough to complement the non-sweetness of the muffin.

Ingredients

1/2 bar cream cheese

1/2 cup confectioner’s sugar

2 tablespoons orange zest

1 tablespoon orange juice

Instructions

  • Whip the cream cheese with electric mixer for 2 minutes until completely smooth.
  • Add orange juice and blend.
  • Add confectioner’s sugar–as much or as little as you like. This is to taste. Blend on high until lumps have disappeared.
  • Blend in the orange zest.
  • Wait until muffins have cooled completely before piping on the topping.

You could also use an apple corer to take out the centre of the muffins and fill them with this, leaving a little swirl on top to cover the hole. Just make sure to double the topping recipe.

orange carrot bran muffins

Kudos to Magpie on this recipe, and the next time you’re in the mood for fibre, I hope you give these a try.

Namaste, little baking buccaneers.

Tagged , ,

Sushi Cupcakes

What’s better than sushi and cupcakes?

Cupcakes that look like sushi, obviously.

Sushi Cupcakes

Sushi is my favourite food ever, so making sushi-cupcakes was an inevitability. I will impart the following wisdom to you that I learned on my journey:

  1. You will need to buy a lot of candy.
  2. You shouldn’t buy the candy 2 weeks before you plan to make the cupcakes because you will eat all of it, even if you try to trick yourself by storing it in the depths of your deep-freezer wrapped in plastic like you’re hiding a body because frozen candy tastes better than room temperature candy and you will still eat all of it and have to go buy more.

I chose to do simple vanilla cupcakes for these–the decorating is fussy and time-consuming enough. I went with my go-to recipe from Leslie Fiet’s Mini Cupcakes. But you can use any recipe you like–probably one that gives you a light-coloured cake.

Sushi Cupcakes

You will need:

  • Black mini cupcake liners. I found mine at Scoop N Save.
  • Assorted candy. I used Mike n Ikes, green licorice, gummy fish, and Licorice All Sorts. You can use pretty much anything you want. I just went to Sticky’s. They have everything in bulk.
  • White sprinkles
  • Orange nonpareils
  • White icing
  • Green icing

Vanilla Cupcakes

Sushi Cupcakes

In stand mixer, combine wet ingredients and mix until smooth, scraping down sides of the bowl.

In a separate bowl, stir together dry ingredients. Add to wet ingredients, blending until all lumps are gone and air bubbles appear.

Sushi Cupcakes

Spoon batter into cupcake liners, filling 1/2–3/4 full. You definitely don’t want any muffin-top action because it would spoil the compact look of the sushi.

Bake at 350 F for 15ish minutes. Cupcakes are done when you can apply light pressure to the centre and it springs back.

Decorating Sushi Cupcakes

sushi cupcakes

Pipe a smidge of wasabi-coloured frosting onto the centre of the cupcake.

With white frosting, pipe a ring around the wasabi, spreading smooth with a knife.

Sprinkle lightly with orange nonpareils–these are your fish eggs.

Next, dip the cupcake into white sprinkles, coating liberally for rice.

Sushi Cupcakes

Top with candy of your choosing. I didn’t think about it too hard.

Just cut them up and arrange until you think they look vaguely like raw fish and vegetables.

Sushi Cupcakes

Sushi Cupcakes

Sushi Cupcakes

Sushi Cupcakes

Sushi Cupcakes

These cute cupcake packages make awesome take-out containers.

Sushi Cupcakes

Sushi cupcakes are pretty easy to make if you take the time to plan and organize everything. Tbh, I didn’t think they’d turn out as well as they did, but I think they’re kind of charming.

Tagged ,

Gluten Free Brownies

Gluten Free BrowniesGluten Free Chocolate Truffle Brownie Mix

When you want to feed your friends without poisoning them

Remember the days when everyone was cutting carbs? Well now everyone and their dog has gone gluten free. My friend has Celiac disease, though, so whenever she comes over I try to have food in the house that’s safe for her to eat. And while I haven’t tried anything from scratch (yet), I’ve come across some great box mixes.

Usually, I veto making anything that comes in a box. But because gluten free baking involves 50 different kinds of weird flour I consider it an exception. Superstore’s organic section has an entire shelf reserved for gluten free goods. The mix I used for these brownies is from Gluten Free Pantry. And they’re SO GOOD.

If you like brownies but not gluten, this is a box mix for you. The brownies turned out extremely chewy with a punch-you-in-the-face chocolate taste.

Gluten Free Brownies

You’ll need: 8×8 pan, butter, eggs, and vanilla (optional)

Gluten Free Brownies

When baking, you should always use room temperature eggs. If you forget to take them out of the fridge beforehand, just put them in a bowl of warm water (not too warm–we’re not cooking breakfast).

Gluten Free Brownies

Beat eggs for 2-3 minutes. Room temp eggs tend to whip up better than cold ones.

Gluten Free Brownies

Add the Chocolate Truffle Brownie Mix. It has tiny chocolate chips in it! Also, I decided not to add the vanilla last minute because I didn’t know if people suffering from Celiac could have it.

Mix until fully combined. I found it became extremely thick and tough to combine, but this in no way reflected on the end product.

Gluten Free Brownies

Pour in melted butter, mixing together and scraping down the sides.

Gluten Free Brownies

Scrape the batter into a greased pan, pressing it into the corners first before covering the rest of the surface. Make sure you grease the pan with either butter or vegetable oil (Pam Cooking Spray contains wheat).

Place in 350 F oven and bake for about 25 minutes. Cool completely before cutting.

Gluten Free Brownies

Gluten Free Brownies

Use a cookie cutter to make cute shapes, if you want. Just eat the excess pieces that get left behind.

The brownies went over well. A lot of gluten free baking can be grainy and crumbly, but these were insanely chewy with a nice hard crust. Also, I really like how the finished product looks exactly like the picture on the box. And they didn’t poison my gluten-sensitive friend, so that was a bonus.